Posts Tagged ‘iPhone app’

OnScreen Pitch Count 1.3 Is Now on the iTunes App Store

Saturday, March 13th, 2010

A new version of OnScreen Pitch Count (1.3), my iPhone and iPod Touch app for recording, calculating, and reviewing pitch results and stats of baseball and softball games is now available. A major improvement to the app is the new ability to email pitch data from a game as an attached file in csv (comma-separated values) format. The csv format is one easily imported into spreadsheet programs such as Excel. Once you have the data in a spreadsheet, you can perform any of the many operations available, such as totaling the various pitch quantities for the all the pitchers in the game and so on. Also, once the data is in the spreadsheet’s rows and columns, it can be easily transferred by cut and paste to a master spreadsheet you may be maintaining with full season results, for example. The email can be sent with an attachment or with just a text summary of the results without even leaving the app. The attachment feature is one that a few OnScreen Pitch Count users had requested, so I’m glad to have it up and running.

The other major addition is the ability to record wild pitches. There is a new button to tap after a wild pitch occurs. A wild pitch is only recorded when a pitcher throws a ball beyond the catcher’s reach with the result that a base runner is able to advance; so the wild pitch (WP) button is only enabled when there is at least one base runner. This should minimize accidental wild pitch recording. This disabling of the button needs to be taken into account in a couple of instances though. When a runner reaches first base after a missed third strike due to a wild pitch, the user should first put the runner on base with the Other OB button, and then record the wild pitch. If the sole base runner scores on a wild pitch, the wild pitch needs to be recorded before the run is recorded, since that removes the sole runner from the bases and disables the WP button. This is only logical, but might not be obvious the first time. These cases are pointed out in the new pdf User’s Guide for OnScreen Pitch Count available for download online. Wild pitches are common at lower levels of youth baseball and softball, so this can be an important statistic in evaluating how a pitcher is doing and in getting to all the factors that contribute to run scoring.

The screen shots below show the new wild pitch (WP) button and the display for the number of wild pitches. It required a little shifting of buttons and labels around, but the result was good and uncrowded.

main

Above is the main screen on which pitch results are recorded by button taps.

details

Above is the screen in which cumulative game pitch totals are displayed.

A coach from Texas called me a couple of weeks ago with a question about OnScreen Pitch Count, which he was planning to use in a game that evening. I confess I was jealous. I’m sitting here in New England on a cold, rainy night, knowing baseball and softball are a month away, and with lots of cold rainouts to come even then. Not only that, when the season starts I won’t be getting a team of kids ready as I did for years in the past. It’s a nostalgic time for memories of when my kids were little. My daughter is still playing, a high school sophomore softball pitcher, and I’ll be there in the stands with OnScreen Pitch Count for all the games I can get to. It’s a good feeling to know there are others (though far from enough!) now using this app I created to capture the pitch results that I, as a coach, would have liked to have had.

You can download OnScreen Pitch Count from the iTunes app Store or find out more about it, including a video and the User’s Guide, at nondummies.com. Previous blog posts (“OnScreen Pitch Count: An iPhone App Preview”, “OnScreen Pitch Count Now On Sale on iTunes App Store!”, and “IPhone App Updates and Experiences”) say more about OnScreen Pitch Count and some of my experiences developing and presenting it.

Free! One Week Only—OnScreen GPA Pro

Thursday, February 25th, 2010

OnScreen GPA Pro for iPhone and iPod Touch, the latest app from OnScreen Science, Inc., has been available from the iTunes App Store for a little over a week. This grade-point-average calculator, with an option for multiple students, features customizable calculation formulas and an easy way to make what-if projections of GPA.

The app debuted on what turned out to be a bad day. Usually when an app first appears on the store it gets a chance to be on the first page for apps in its category ordered by release date for a day or two. There were so many apps released on the same day that, due to its assigned time of release, OnScreen GPA Pro ended up near the bottom of page 4 in the Education category from the start and then went to page 9 (virtual oblivion) the next day. It makes a lot of difference from the standpoint of initial sales to be visible on those first couple of days. Having missed that opportunity, OnScreen GPA Pro has had to rely from the start on people using the iTunes search system to come across it. A search on “GPA” brings up several apps, and, as a newcomer, OnScreen GPA Pro is not near the top of the list, not even visible unless the person chooses “Show All,” which makes it less likely people will check out its features to discover the extra power it diflucan offers.

One of the things that’s making it harder to even get that initial visibility due to a new release on the iTunes App store is that quite a few developers are releasing suites of apps all at the same time. For example, OnScreen QB Stats got swamped by a slew of apps that just followed NFL players on Twitter. There was a separate app for each team! OnScreen GPA Pro ran into a couple of foreign language series. I wish Apple would come up with a way to show a suite of apps as a single entry.

Since I last wrote about OnScreen GPA Pro, I’ve made a four-minute video to illustrate how it works. Also note that the OnScreen GPA Pro User’s Guide is online.

In order to get OnScreen GPA Pro onto more iPhones and iPod Touches and hopefully to thereby generate some good word-of-mouth (or blog) advertising, I’m making the app free for a week. Just go here and download it. If you like OnScreen GPA Pro, I hope you’ll rate it and perhaps write a brief review. If you don’t like it—and especially if you encounter a problem—please email me about it, whether or not you lasix rate it.

Tell anyone you know who might be interested in having https://www.worthingdentalcentre.co.uk/lasix-online/ an easy way of calculating GPA and having handy access to GPA records about this limited-time free download.

OnScreen GPA Pro: An iPhone App Preview

Wednesday, February 10th, 2010

My very long absence from this blog has been due once again to work on an iPhone app, but I plan to take a break from coding, assuming the app, which I just submitted to Apple for approval today, doesn’t require quick revision. As the title of this post no doubt indicated to anyone potentially interested in the app, it is an app that calculates grade point averages, universally known as GPA among those concerned with them. My first encounter with the concept was as a college undergraduate. My high school had kept what amounted to an equivalent sort of average, the one where an A was a 95 and so on. In college, where courses might have different credit values assigned to them, a different method was needed, based on the idea that, for example, making an A in a 4 credit course and a B in a 3 credit course was a better result than if the grades for the two courses were swapped. So grade points were assigned by multiplying the worth of the grade times the credits for the course, with an A being worth 4, a B worth 3, and so on. Add the grade points up and divide by the sum of the credit values of the courses to obtain the GPA. For historical accuracy, I should state that the University of Texas in my day used a 3 point maximum (for all A’s) system, but the principle was the same.

It seems most high schools have by now adopted the GPA method of ranking students. That much I understood, but in recent years I became aware of a wrinkle that has been added to high school GPA calculation. At my kids’ high school, an honors class gets an extra half a point added to its grade, making a 4.5 the maximum grade point per credit for an honors class, while an Advanced Placement (AP) course gets a full extra point added. I suppose one motivation for this “weighting” of grades (as its called, though I’d have called it “incrementing,” since there’s not really a multiplicative factor involved) is to encourage students to take the more challenging courses without fear of bringing down their GPA. Of course it also encourages students that are competing for class ranking and to get into very competitive colleges to load up on AP courses. Given that weighting of courses seems to have become the rule, that then puts students at high schools that don’t offer AP courses at a disadvantage, which has led some colleges to look rather at “unweighted” GPA. Other college admissions offices may keep the weighting, but eliminate the non-academic classses such as gym, as they recompute the GPA.

Thus there can really be a number of GPA a high school student might be interested in knowing. A college student needn’t consider weighting, so far as I know, but a student planning to apply to graduate schools may need to be mainly concerned with grades in the major subject, possibly only the upper division courses. I know that as a physics undergraduate, I was given to believe that my GPA in upper divsion math and physics courses were what mainly mattered. It was these sorts of considerations that convinced me that a flexible GPA-calculating app that allowed the user to maintain a set of customizable formulas for doing the calculations would be worth developing, since from what I could tell there wasn’t such an app already being sold.

To obtain the flexibility I wanted, the app would need not only to do weighted and unweighted calculations, it would also have to provide an easy way to include or exclude certain courses such as non-academic ones or courses outside the major. So in addition to having standard, honors, and AP categories, I added an “other” option, just for ease in selecting whether to use a course in a given calculation. An example of a course definition is show in the app screen shot below.

course

An example of a calculation method with the choices available is shown below. The user can create just those of the four possible definitions (weighted/unweighted with others included/excluded) wanted for the GPA records. When I say four, I’m assuming the other options of grade step and A+ handling would be the same for all calculations of interest, which might conceivably not be the case.

method

If even those four aren’t enough for a particular case, I’ve made it easy to duplicate a whole year’s (or other term’s) courses. Thus there could be two versions of the Sophomore Year with some courses absent from one of them. A simple on/off switch in the list of terms makes for easy switching between the two cases. This feature of optional inclusion of a term in the GPA calculation can also be used for calculating the GPA under different future scenarios. Note the “Best Case” and “Worst Case” Junior Year options in the screen shot below.

main

An example of the courses defined for a full term is shown below.

term

I also decided to make the app capable of keeping the grade records and GPA calculation methods for multiple students. All the GPA files stored on a given iPhone or iPod Touch are available for inspection and modification through selection from a list, as shown below.

files

Finally the app description that was submitted is seen below. Details of how the app works are in the User’s Guide.

OnScreen GPA Pro provides these extra benefits:
• Gives you the power of multiple customized GPA calculation formulas to match any school’s method.
• Lets you keep grade records and calculate GPA for any number of students.
• Makes defining and calculating GPA for what-if scenarios a snap.
• Makes it easy to calculate GPA including or excluding a user-defined course category.
• Allows fractional credits.
• Simplifies entering new data by allowing duplication of existing courses, terms, and whole files.

See the OnScreen GPA Pro User Guide at http://nondummies.com/onscreengpapro.pdf to get a fuller picture of the app’s power and simplicity.

Say you’re a high school student and you’ve set up your GPA calculation to match the way your school does it. That’s what you need for determining class rank. But what if the college you’re applying to turns out to use a different method? Perhaps they don’t consider non-academic courses, such as gym. Perhaps they don’t use a GPA “weighted” to give extra grade points to honors and AP classes. With OnScreen GPA Pro, you just define a new method to match that school’s way and calculate GPA using whichever method you choose. There’s no point being limited to one or two calculation formulas, when this app lets you define one to match that of any school or to make one up to satisfy your own curiosity.

In addition to standard, honors, and AP categories for classes, there is a “wild card” category called “other”, which can be anything you choose it to be. You can define a calculation method to exclude the “other” category. For example, if you’re a college student considering graduate school, you may find that upper-division courses in your major are of greatest importance. OnScreen GPA Pro makes it a snap to calculate your GPA for just those courses. If you’re a high school student, you can peg your non-academic courses as “other” and define a calculation method that excludes them, while having another that includes them.

The app is flexible in another valuable way. You can easily include or exclude from your GPA any given terms or years you choose. In addition to making it easy to see how your GPA has changed from year to year, this gives you the power to make “what if” scenarios for the future. What if you make all A’s your senior year? Just define a best case senior year as one of your terms. Include it in your GPA calculation to see how much it can change where you currently stand. It’s as simple as tapping an on/off switch on your iPhone screen. Use this as a motivational tool.

If you really are a “GPA pro,” i.e., someone whose job involves accessing a lot of GPA, such as a high school guidance counselor or college admissions interviewer, then OnScreen GPA Pro’s ability to keep complete grade records with GPA for any number of students on your iPhone or iPod Touch is obviously a feature you can use. But even if you’re not a pro, you may appreciate the ability to record the grades for all of your children or for friends and siblings. The other benefit of having multiple files is that you can make a backup file, just in case you accidentally delete something from your record.

To make entering new terms and courses faster, OnScreen GPA Pro lets you duplicate ones you’ve already created. It’s faster to duplicate your whole junior year with the name senior year, then go through and edit the course names and grades than to create a new term called senior year and add courses to it one by one. But you can do it either way. Duplicate your whole file to make a backup or to use as a template for making a file for a friend with a similar schedule.

Taken together, the features outlined above put OnScreen GPA Pro in a class by itself.

OnScreen QB Stats: A New iPhone App for Evaluating Quarterbacks During and After a Game

Wednesday, December 30th, 2009

OK, having spent several weeks working on OnScreen QB Stats™, a sports-category iPhone app that just made it to the iTunes App Store about a week ago, I want to say something about it and how it came to be. As its name will probably imply to most readers, the app concerns American football (I’d forgotten the field has a different length in Canada, so Canadian football must wait), specifically the player that is most important on most teams, the quarterback (QB). He’s the player that handles the ball on virtually every play and has the biggest chance of deciding who wins the game through his ability to move the ball down the field in big jumps by completing passes, including some that score touchdowns. Of course the quarterback can also squander a down by throwing a pass that can’t be caught or, much worse, he can give the ball to the other team by throwing a pass that’s intercepted. Naturally people would like to quantify quarterback performance, so, in addition to being a very important player, the quarterback is the player for which there are the most statistics recorded and calculated. OnScreen QB Stats enables one to record a quarterback’s raw passing results during the course of a game and review the derived stats such as completion percentage as well. It can be used to record and display on an iPhone or iPod Touch the passing stats of every quarterback in the game for each team.

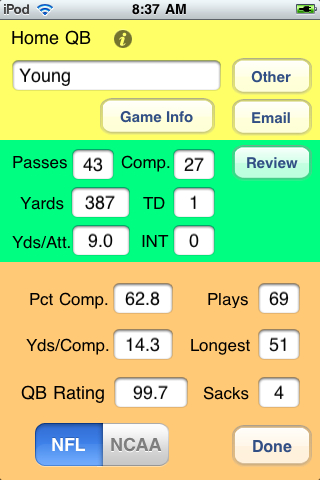
The full set of quarterback statistics recorded and calculated by OnScreen QB Stats is shown below.

details
The User’s Guide for OnScreen QB Stats is available as a pdf file. There every button and display is briefly explained.

After finishing my first app, OnScreen Pitch Count™, I had begun to think about making a version for the iPhone of OnScreen DNA (my virtual model of the double helix molecule of life, which runs on Macs and Windows PCs). I had already started experimenting with OpenGL ES toward that end, when it occurred to me that a lot of the nitty gritty coding I’d already done for OnScreen Pitch Count, which allows a user to record and review the results of baseball pitchers’ pitches, could be easily adapted to an app that followed quarterbacks’ passing results. That is, the machinery for saving and restoring the passing results, for reviewing those results, and for setting up the data storage for the results of individual quarterbacks on the two opposing teams, would be but a minor change from that already developed for the pitchers in OnScreen Pitch Count. That actually turned out to be pretty true. One modification was that I had to allow for the possibility that a quarterback might re-enter the game after being replaced for a time, which is not something that happens in baseball.

I had also assumed that the actual data entry by tapping buttons on the screen would be at least as simple for the pass results as for the pitch results. I thought the bookkeeping involved would be simpler for football, since I wouldn’t have to worry about strikeouts, walks, outs, base runners, and innings (not to mention complications such as charging runs to pitchers after they’d left the game). I thought I’d be able to write the football app in three weeks or so, finishing it in time to justify working on it for the current season. Since every high school, peewee, and non-bowl college game in the country (as far as I know) had been played before the app finally became available, I obviously misjudged the complexity of the task. All in all, when I consider things like the extra choices that had to be coded for undoing an action (e.g. completely wipe out a touchdown pass, call it incomplete, or place the ball short of the goal line), and the numerous states to which the app might need to be restored after an interruption (e.g. awaiting line of scimmage determination after a pass completion) the quarterback app seems to have been more work than the pitching app.

There is less to record for a quarterback than for a pitcher. We need to record attempted passes, completed ones, and intercepted ones. Then we need to keep track of the yards gained passing and the number of touchdown passes. Those are the basics. I added quarterback sacks and longest completed pass for good measure, but from the basic pass statistics we can calculate derived quantities such as yards gained per passing attempt and the rather arcane numbers called quarterback rating in the NFL and passing efficiency in the NCAA. Both of these rating methods use pass completion percentage, yards per attempt, interceptions, and touchdown passes to come up with a number that serves as a basis for comparison among quarterbacks. Although, the number is much less meaningful in a single game than in a season, it can be of interest to know what it is for a game, and OnScreen QB Stats will calculate and display whichever measure of quarterback performance the user desires.

Although the data to be recorded might seem at first glance to be simple, in practice it is more complicated. Someone sitting in a press box with a spotter to provide the details of each play could get by with an app that recorded completions, incompletions, yards gained, interceptions, and touchdowns. But for someone watching a game from the sidelines or stands or even on television, there is the problem of determining how many yards were gained on a given play. The only way to do that with full confidence is to keep track of where the ball is after each play, since one doesn’t know in advance which plays are going to be passes. Once a play is underway, it is difficult to note the line of scrimmage from which play started and then calculate yards gained by noting where the receiver was brought down. It’s a lot to take in and keep straight in a short time, even assuming one has a good view of the sideline yard markers, which is often not the case when watching a game on television. The additional challenge is to do all the data entry on the iPhone without recourse to pencil and paper or on-the-spot mental calculations.

OnScreen QB Stats solves the problem of passing yardage calculation by making it easy to record the new line of scrimmage after each play; and if the play leading to the change of field position is a completed pass, the app automatically calculates the corresponding gain in yards and adds it to the total for the game, while adjusting all other stats that depend on passing yardage as well.

It took me a lot of trial and error to come to this easy way of recording the new line of scrimmage after each play (or penalty). At one point I had thought that using a slider control to just slide a pointer along a representation of the 100 yards of the field to mark the current line of scrimmage would be both intuitive and fast. I ran into two problems with the slider method. For one thing it was hard to quickly obtain the precision I needed down to the yard, which is only 1% of the length of the control. So, I added a second fine-tuning slide control to move the pointer just within plus or minus a couple of yards of where the full-field control pointed. This solution worked, but frequently required using both controls, which was a nuisance. I might have decided to live with it, given the intuitiveness of the slider, but the controls turned out not to be reliably responsive on an actual device. Sometimes the sliders were easy to drag, sometimes they seemed in need of a squirt of WD-40. It was hard to ditch all the work that I had put into that method of yard line setting, but I decided I had no choice but to code a new method.

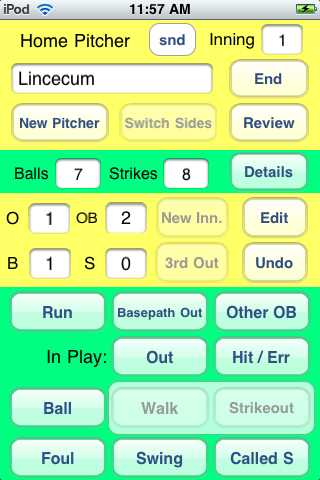
The solution I came up with can be seen below.
yardset
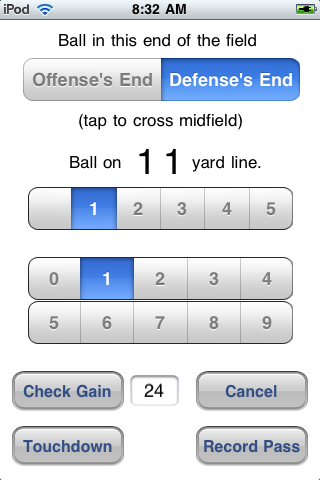
The screen above shows how one enters the new line of scrimmage after a play has been completed. This screen appears whenever the user taps a button to record a play from scrimmage or a penalty (or simple need to adjust the current setting for the line of scrimmage). In the example shown the team with the ball has reached its opponent’s eleven yard line. Note that the “Defense’s End” is highlighted in the top control to indicate which end of the field the ball is in. That control also adjusts so that the ends of the field in the sense of right and left correspond to what the user sees, assuming the initial setup has been made correctly and the correct quarter has been maintained. Whenever the ball goes to the other team (currently called Defense), the labeling of the top control reverses (Offense becomes Defense and vice versa), so that the field situation is correctly mirrored. At the end of the first quarter, for example, the same switch takes place.

The yard marker for the current line of scrimmage is shown to be 11, and that choice has been made by tapping the tens place control (blank to 5) on its “1” and the ones place control (0 to 9) also on its “1”. There is no keyboard to deal with, and for short yardage plays only the ones place control needs to be adjusted in many cases.

The number 24 beside the “Check Gain” button shows that the user has tapped that button in order to see how many yards will be recorded as having been gained, assuming the ball is marked at the 11 yard line. The previous line of scrimmage must have been the opposing team’s 35. The “Record Pass” button is to be tapped once the user is satisfied with the choice of yard line (here the 11) and need not be tapped until the final spot has been made to minimize the need for adjustments. The button’s title being “Record Pass” indicates that the play just over was a completed pass. On a running play (or pass by someone other than the quarterback), it would be reading “Record Gain” (or “Record Loss”). The “Touchdown” button’s use is obvious, and in the case of a touchdown pass, there is no need to set the yard line button by hand.

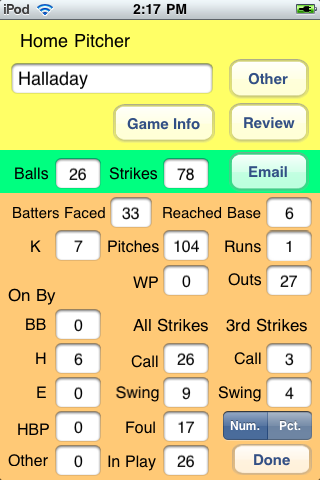
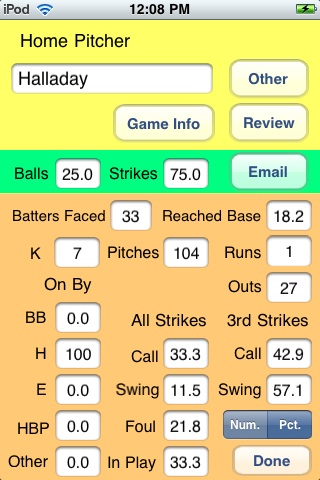
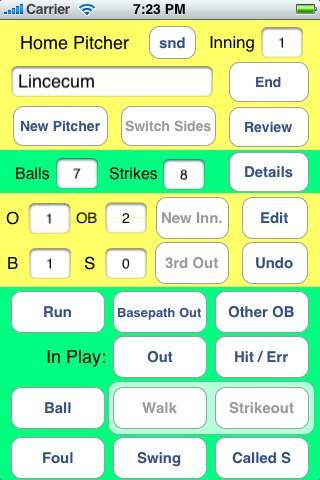
The screen below shows the most basic results of the quarterback’s passes and also contains the buttons for registering which type of play has occurred. The pass results shouldn’t need description. The four buttons stacked in the lower right are for recording pass results or for canceling out the previously recorded play (“Undo”). We are especially interested in eliminating the chance for accidental recording by unconscious taps for these four buttons, so they all require a double tap to work. Double-tapping the “Incomp” button just increments the number of passes and the Down, which is displayed in the yellow area along with the yards needed to make a first down and the current location of the ball, which is the opponent’s 42-yard-line. The display of the “42” in red indicates the team with the ball has crossed midfield into the other team’s territory.
basics
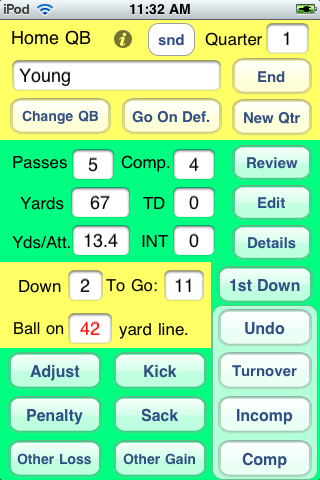
The down and yard marker are kept up to date by the app as a way of providng a check on whether the user has entered any data incorrectly. For example, if the user had failed to register that the team had crossed midfield, and had chosen the 42 yard line in the quarterback’s team’s end of the field, the display would be in black instead of red. As a further means of insuring ball movement is recorded in the proper direction, the user has two buttons to choose between for plays from scrimmage other than quarterback passes—”Other Loss” and “Other Gain”. If a gain has been chosen, then the new line of scrimmage must be in the right direction for a gain. The other buttons are to be used for what you’d expect given their titles. Kicks and turnovers lead to the other team having the ball, as do touchdowns. The “Go on Def.” button also gives the other team the ball, but shouldn’t be used except to correct a user mistake or when there’s been a fumble lost after a turnover of some kind not on a play from scrimmage (e.g. fumble lost on punt return).

Using OnScreen QB Stats just amounts to keeping track of the line of scrimmage and recording pass results. The app does all the calculations, including yards gained on passes. Recording pass results for a game on television can be challenging because so few announcers now state where the ball is after every play (I’d guess less than 25%). The line of scrimmage is often not shown until right before the snap, and it can often be difficult to see where a runner was tackled due to the camera angle when the tackle occurred (followed by the three replays with no view of the sideline markers). Even a televised game can be followed smoothly, though, after a little practice.

I think I can safely say that as of now there is not another app that allows one to record all of these passing results and view these stats for quarterbacks during the course of a game. So I’m hoping word gets out to those crazy folks (like me) that might like to have that power. If you know one, pass the word. It’s on the iTunes App Store here.

IPhone App Updates and Experiences

Tuesday, December 22nd, 2009

The biggest news on the app front is that OnScreen Science’s second iPhone app, OnScreen QB Stats, an app for recording, calculating, and reviewing the passing statistics of quarterbacks during and after football games, is now available on the iTunes App Store. I’ll devote another post to that soon, maybe tomorrow, but I want to catch up here on app number one, OnScreen Pitch Count.

OnScreen Pitch Count went on sale from the iTunes Apps Store August 26. I won’t go into the details of the typo I had in the press release I sent out or dwell on how the video I posted to show the app in action worked fine on a Mac or Windows PC, but not an iPhone. That’s all in the distant past, fixed and forgotten.

Once the app had made it to the iTunes App Store, I was looking to find reviewers for it to help get the word out. I’d had magazine reviews of my science education software in the past, all of them quite favorable (a four-star Macworld review of OnScreen Particle Physics caused a major uptick in sales years ago), but not in a long time and never, of course, for an iPhone app. My number one hope was that the Macworld web site would post a review. As luck would have it, Macworld had not long ago reviewed another pitch count app. That showed they had someone sufficiently interested and knowledgeable to do a review, but it might also make it less likely they’d want to devote space to another example in this little niche, even one that was better than the first, especially so late in the baseball season.

Apple provides every developer of an app forty “promo codes” for the free downloading of each new app or update. I sent a promo code with a review request to the email address of the Macworld reviewer, but never got so much as an acknowledgement. I hadn’t counted on a Macworld review anyway and had found other iPhone review sites (a good number of which are devoted solely to games) and approached a few of them. One or two review sites responded with the suggestion that I expedite a review by paying them. That I wasn’t about to do, and I wouldn’t really trust their reviews after knowing how they operate. A couple of reviewers took the trouble to download the app, test it thoroughly, and write a review of it, for which I am grateful.

The two iPhone app review sites that reviewed OnScreen Pitch Count were AppGirlReviews and JustAnotherMobileMonday (JAMM). I ran across the AppGirl on Twitter, and she was happy to take on the review (actually to pass it on to someone on her staff). I learned of the JAMM site via Google. JAMM had reviewed iScore, a baseball scorebook app, for the iPhone. This review showed the reviewer to be a baseball fan who liked to keep score during a game, which I thought, correctly as it turned out, made him a good candidate to review OnScreen Pitch Count.

Even though I felt the app was solid, and it had passed Apple’s review, I still felt some anxiety over the possibility, however unlikely, that a reviewer would uncover a crashing or data-scrambling bug. On that score I was quite relieved, as both reviewers had nothing but good experiences to report. There was plenty of agreement on the performance and power of the app and its ease of use, really, despite complaints about interface. The JAMM reviewer in particular disliked its looks, and I can’t blame him. I had used Apple’s Interface Builder’s oddly minimalist, totally two-dimensional rounded-rect default buttons for the interface.

My hope was that someone wanting to track a kid’s pitches wouldn’t be totally repelled by the looks, and I didn’t want to delay the app’s launch any more than I had to. Of course an unappealing interface can indicate overall lack of care, which by assumption might carry over to the actual functioning of the app. Fortunately, the reviewers used the app enough to see how well it worked. The JAMM reviewer couldn’t stand the app’s looks, but acknowledged that “like the story of the Ugly Duckling, there really is a fantastic and robust app hidden inside there.” In addition to general aesthetic objections, he wanted a more graphical interface (instead of labeled buttons presumably), but I confess I don’t know how to come up with something that would convey “ball” as well as the word. And so on. A great deal of experimentation went into button placement in fact during development.

For opposite reasons, which is interesting, both reviewers emphasized the limited market for OnScreen Pitch Count. The (male) AppGirl reviewer, in particular, seemed downright offended that I suggested in the app’s description that a normal fan might enjoy tracking pitches in a game he or she was watching. My claim was based on my own experience in testing the app, but the reviewer really took exception to the idea, noting that nonetheless he would let it pass and only report on how the app functioned. That is basically what he did, and he had plenty of good things to say, recommending it without qualification for coaches and parents of pitchers. But in closing he came back to say that otherwise it was of interest only to “fanatics,” and that it was “burdensome” to record pitch results. Despite all the positive things he’d said in the middle of the review (the only serious complaint was lack of email capability, which he thought was a “glaring” defect), he gave the app a mediocre numerical score.

The JAMM reviewer, on the other hand, felt the app would be of limited interest because a regular (not a fanatical) baseball fan wants to record much more than pitching data, as in a full scoring of batting and baserunning results. Clearly there is a wide range of fan interest in keeping personal track of what’s happening in a baseball game, from nothing to everything. I still think there are some that may want pitching stats in particular, since pitching is so important, especially when it comes to managers’ decisions.

I was so happy that both reviewers (real world people I’d never met) had found the app to work perfectly and to be of great potential use to its primary audience that I didn’t let any negative comments bother me. Really.

A little after the reviews appeared someone posted a user review on the iTunes App Store, which gave OnScreen Pitch Count five stars, but also mentioned the need for email. My first update would add email. This update (version 1.1) was approved and posted for sale on the iTunes App Store on September 17. After the update had been posted, I noticed the iTunes summary said that iPhone OS 3 was required for my app. Since I had gone to quite a bit of work (following Apple’s guidelines faithfully) to use the improved emailing capability of version 3, while providing downward compatibility with OS 2.2 (through use of weak binding and conditional execution, for the cognoscenti), I was not happy about this. My query to Apple was unanswered. I decided to live with it and move on to requiring OS 3 or greater for future updates. This affects iPhone customers almost not at all, but about half the iPod Touch users have yet to upgrade the OS, since they have to pay to do so. I recently discovered an iPhone developer discussion thread about this very problem of OS-requirement change as being due to an Apple bug.

Another user rating led to version 1.2. This user expressed the desire to see pitch results expressed in percentage form as well as total numbers. The update incorporating this new feature was posted for sale October 15. Finally, I addressed the ugliness issue and made the minimal, but significant, change to the use of better-looking buttons. The new buttons, while not photo-realistic, are pleasing I think, looking a bit like they’ve been rendered by colored pencil shading. Version 1.2.1 with the new look was approved as I wrote this.
basic
basic

UPDATE: See also “OnScreen Pitch Count 1.3 Is Now on the iTunes App Store”.

OnScreen Pitch Count Now On Sale on iTunes App Store!

Saturday, August 29th, 2009

OnScreen Pitch Count, my iPhone “app” for recording pitch results in a baseball or softball game has been approved for placement on the iTunes App Store and is now available for purchase, in the Sports department, naturally. The past couple of posts here (OnScreen Pitch Count: An iPhone App Preview and How I Made a Quick-and-Dirty Six-Minute Demo Video of My iPhone App) have been devoted to describing the app and my efforts to get it ready.

The only way to sell an app for the iPhone and iPod Touch is through the App Store, and Apple has to approve individually every app that goes on sale there. The estimated time for this approval had been quoted as about two weeks when I submitted OnScreen Pitch Count on the night of August 12. I hurried to get it done then because I was going to be out town for five days, visiting family.

I spent the next couple of weeks wondering if I’d somehow introduced a fatal bug at the last minute (“impossible,” but still one thinks about the impossible sometimes) or if the reviewer at Apple might be someone that didn’t know the first thing about baseball. The evening of August 26 arrived, and OnScreen Pitch Count still hadn’t been approved. Then, almost two weeks to the hour since I’d submitted my app, I got the email saying it was now on sale on the iTunes app store.

Sure enough, within an hour or so the link embedded in my email worked to take me to the OnScreen Particle app’s display on the iTunes App Store. Sure, it’s too late in the baseball season to make many sales now, but it’s still a good feeling to know the app has been approved.

Let me quote a couple of paragraphs from the iTunes app description:

OnScreen Pitch Count from OnScreen Science, Inc. is an app for anyone wanting to have the pulse of a baseball or softball game at his or her fingertips. Pitching is the key to the game, and with OnScreen Pitch Count you’ll have data that even the tv analysts don’t. You’ll know how many pitches each pitcher in the game has thrown and exactly what the net results of those pitches have been.

Whether you’re watching your favorite team play, listening to a game on the radio, sitting in the stands at your child’s Little League game, or coaching a game in which extra pitching data could help you make the right decision, you’ll find OnScreen Pitch Count enhances your enjoyment of the game as it increases your understanding of it.

If you enjoy following baseball or softball, and especially if you coach it at any level, you should check OnScreen Pitch out. Even if you don’t really need it until next spring, you might as well get it and learn it now. I welcome comments and questions. See the email address in the right hand column.

UPDATE: See also “IPhone App Updates and Experiences” and “OnScreen Pitch Count 1.3 Is Now on the iTunes App Store”.

How I Made a Quick-and-Dirty Six-Minute Demo Video of My iPhone App

Monday, August 24th, 2009

My iPhone app OnScreen Pitch Count (submitted to Apple, but not yet approved for App Store placement) is easy to use. Even so, describing how it works, using only words and still images can be tedious and may give the impression that it’s more complicated than it is. The draft user’s guide for OnScreen Pitch Count details what every screen button is for. Most of them should be immediately obvious, but the sheer number of buttons might make learning seem an unpleasant task, at first glance.

I clearly needed a video presentation of OnScreen Pitch Count that showed both how to use the app and what it was to be used for. Not knowing either the timetable or the exact procedure for the Apple review, I also felt the need to get something online as soon as possible, just in case an Apple reviewer, with the app’s fate in his or her hands, came to the web site looking for help in using it. I originally thought that a video of me or someone else tapping the buttons on the screen would be best, as being more realistic and possibly making the viewer want to start doing the same thing. That may be true, but given my resources and my impression of some rather pathetic online videos of iPhone game play, where the player’s fingers really got in the way, and the focus was poor, I decided to opt for making a screen recording of the app running in the iPhone Simulator, which Apple provides for testing apps under development.

Since most button taps lead to the tapped button’s being highlighted, it should be easy for the viewer to follow the action, imagining the invisible finger or thumb of the user. I already had used a Macintosh program iShowU for making a screencast demo of OnScreen Particle Physics, OnScreen Science’s modern physics teaching software, so my first thought was to try iShowU. First I went to its web site to see if there was a new version. There was, one that required Mac OS 10.5. This raised the question of whether the version I had would run under 10.5 at all. Since there was a discounted upgrade price I decided to look into the upgrade. Unfortunately to get to the upgrade page, one had to enter a password, the meaning of which was not explained anywhere I could see. I decided to launch the older version to see if the password might be found there. The good news was that the older version launched OK under 10.5, but the serial number turned out to be extremely long and with no way to copy it. Perhaps some old email would have it, but that was enough to deter me from the upgrade, since I wasn’t even sure the serial number was in fact the required password. I decided to see how well version 1.7.2 would work before revisiting the upgrade or alternative software question.

iShowU provided an easy, intuitive way to capture just the portion of the screen I wanted. There was a draggable, resizable rectangle, which I could put exactly over the iPhone Simulator’s on-screen representation of the iPhone device. The on-screen instructions said to hit return to set the recording area. Nothing happened to indicate that the capture rectangle had been registered when I did that (several times). It seemed this might be an incompatibility with 10.5, as I had feared. What else to do but try quitting and relaunching? That did the trick, though as usual in such cases, I’ll never know why. I did a couple of short practice runs. It was working, saving a QuickTime mov file to the desktop, each time. I then plugged in my USB microphone, the Blue Snowflake, and tested it with commentary enough to see that the audio worked. About a megabyte seemed to be required for each minute of recording, which I thought was within reason.

Clearly, though, I could not just improvise my way all the way through a demonstration. I would have to script it, and try to keep it around five minutes. It was immediately apparent to me that methodically going through the use of each button would be boring, and probably impossible to do without a context for the button usage. At the risk of sounding dumb, I decided to use a made-up game scenario, which I would narrate sparingly, to illustrate the app. I typed the script as fast as I could, thinking of it as a first draft. Looking at it now, I can see a couple of things I might have added, and a couple of places where the order might be improved, but it covers most aspects of the app’s usage to record pitch results in a game. When I do it again, I’ll probably include a runner caught stealing and a batter reaching base after a dropped third strike. I definitely should have shown the use of the Undo button, but its visible presence hopefully makes the point that it is possible to undo actions.

Now, how to do it physically? The script went beyond one page, but I didn’t want to have paper rustling sounds recorded, and I needed to have my hands free to use the trackpad and keyboard on my MacBook Pro anyway. I should note that I turned off the mouse cursor recording feature of iShowU since I didn’t want the movement of a mouse pointer across the screen to be highlighting continually that this was a simulation on a computer screen. I didn’t try to get a visual display of mouse clicks (simulated button taps) since the mouse clicks almost always highlighted the button anyway. One place where the simulation didn’t match the standard iPhone screen was when I typed in names. The iPhone keyboard appeared in the simulation, but I would have had to click with the mouse pointer on each letter in order to show the big letter that appears beside the tapped key. This would have been much too slow, so I just typed on the computer keyboard, which accomplished the job much faster, but without the usual visual display.

I decided to lay the two pages of the script out side by side to avoid the paper handling problem. It was still challenging to go back and forth between the screen and the script, and I lost my place a couple of times and had to do some improvising. The result was bad enough in one six-second interval that I decided to edit the audio track, which I’ll tell about below. I may do more editing later. The method I used for script page display wouldn’t work for anything longer than what I recorded. Maybe I could use a page turner the way pianists do.

Despite the less-than-perfect delivery and the deviation from the script in places, I went ahead and posted the demo as recorded, copying the javascript code I had used previously to play the OnScreen Particle Physics QuickTime demo. One place where my voice trailed off while I obviously searched for what I wanted to say seemed worse and worse the more I thought of it (played it, actually). I wasn’t sure how to edit the audio part of the mov file, but I knew there had to be a way to replace the flawed section. I had Audacity, the free audio recording and editing software distributed under the GNU General Public License, on my hard drive, so I thought I’d give it a try. Audacity imported the mov file via the Open command. I was able to locate the problematic section without any trouble and see that it was six seconds long.

Now what? I had to record a replacement for the bad section. I considered doing it with Audacity, but for some reason I don’t recall now I didn’t succeed immediately, so I decided to use QuickTime Player (Pro) as my recording software. Recording with QuickTime Player proved easy once I realized I had to set the input source as the Blue Snowflake microphone via the Preferences panel, just as with Garage Band. I recorded what I thought was a major improvement both in wording and diction. I then opened the file with Audacity and located the beginning of the substitute sentence. Since it was spoken without hesitation or searching for words, it took a considerably shorter time than the original one had. In order to keep the rest of the audio in synch with the video, I just selected six seconds from the new recording, which included a good bit of silence at the end. I then went to the old mov file audio track, which still had the undesirable six seconds selected, and did a paste. Would it combine the two, insert the new audio before the old, or replace the original as one would expect? It replaced the original. I could now play right through the edited section without hearing any obvious “splicing” effects. I did regret not having given a little silence at the beginning of the new segment, but the result was well within the Guy Kawasaki “Don’t worry, be crappy” standard. I have a feeling anyone that knows there was an edit done somewhere will be able to pick out where it occurred, but it is definitely an improvement over the original.

I still didn’t have the new audio inserted into the video. A straight save from Audacity would only give me an Audacity project file rather than a mov file with a video track, so I did an export to AIFF, an Apple audio format I knew QuickTime could handle. It took a little bit of searching through the QuickTime Player Help, but I found the procedure for adding a soundtrack to a mov file. I opened the new AIFF file I’d exported from Audacity and chose Edit->Select All, then Edit->Copy. Then I opened the mov file with the original sound track and selected Edit->Add to Movie. I played through the “bad” spot and discovered I had just added a second track, so that both versions played in the six-second interval I wanted to change. No big surprise, but I had thought it might just replace the soundtrack. Revert. Then I rediscovered that Window->Show Movie Properties revealed the video and audio tracks of the movie. I selected the audio track and deleted it. Then I repeated the procedure for adding the new sound track and ended up with what I was after. I then replaced the online mov file with the newly edited one. The next edit will be much easier. One of the reasons for writing this is so that I’ll have it for future reference.

So, is a something-less-than-professional, hand-rolled video better than nothing? I have no doubt that it is. There really is no easy way to convey the app’s usage with text and still images. I plan to improve on this first video effort; and, as I await Apple’s approval, I may be moved to do the whole thing over, but I feel it is an asset already. You can see and hear the results here.

OnScreen Pitch Count: An iPhone App Preview

Wednesday, August 5th, 2009

I’ve been explaining the infrequency of my postings here as due to the time I’ve spent working on an iPhone “app.” Now that it’s about to be submitted to the iTunes App Store for inclusion on that exclusive online site for selling (or even giving away) iPhone apps, it seems I should give my devoted readers a preview of the app: OnScreen Pitch Count, the first iPhone app from OnScreen Science, Inc.

Pitch Count? “How could you take that long to make a pitch counter?” you may be thinking (and perhaps “How is it better than the mechanical clicker kind you can buy at the hardware store?”). Hopefully a description xanax of what the app can do will answer both those questions.

The screenshot below shows the main display and the buttons one taps to record pitch results. Incidentally, I considered naming the app OnScreen Pitch Results since it more accurately describes what the app keeps track of, but that name is two characters longer than allowed before being truncated in the App Store listings, so I’m going with Pitch Count, which may be better anyway. The name of the current pitcher is displayed at the top. This example is from a moment in this year’s MLB All Star game.

The buttons in the lower green area are the ones that record each pitch result. One of my first tasks was to determine just what I wanted to keep track of. I referred to my own experience as a Little League coach and also as an interested baseball fan. I rejected the level of detail that would include pitch location and pitch type (curve ball, fast ball, etc.) as being more than anyone but a pitching coach or scout would probably want or be able to handle, not even considering the difficulty in coming up with a user-friendly way of recording that much information for each pitch.

basic
Using a basic knowledge of baseball and some trial and error, I came up with the buttons that are displayed above. In keeping track of strikes thrown we need not only to record pitches that add to the strike total in a given at bat but also the pitches that result in foul balls after two strikes have already been recorded or that result in balls being put into play, leading either to an out being recorded or to the batter reaching base. A great deal of thought and experiment went into choosing the size and placement of the buttons, which I have (Lisinopril) found to be easy to use in the actual flow of a game.

The bottom two rows of buttons are for recording pitches not put into play: balls and the three kinds of strikes. The Walk and Strikeout buttons are not enabled until four balls or three strikes have been registered. I found from experience that putting in the extra step of recording a walk or strikeout reduced the chance of error and made the situation that much clearer. The Undo button can be tapped to undo the results of as many as two pitches, for example for changing a ball into a called strike after a hasty tap made before the umpire had spoken. It can also, of course, be used to cancel an accidental tap of any button. When three strikes have been recorded, the Strikeout button is highlighted to indicate the next step, and all other ball and strike buttons are disabled until the strikeout is recorded or the strike call is undone. At any time, only the buttons that have meaning are enabled. For example, if there are no runners on base, the Basepath Out and Run buttons are disabled. At important steps such as recording the third out, the next button to be tapped is indicated by highlighting (as mentioned previously for recording a strikeout).

Above the two lower rows of buttons are those relevant to balls put into play and possible results with runners on base. As currently programmed, hits and errors are recorded but without the specific type of hit (single etc.). The Out button is tapped whenever a ball hit by the batter results in the batter being put out before reaching base or in a baserunner being forced out. A basepath out is recorded when a runner is put out not as the result of a hit ball, say caught stealing. In the case of a double play, both an out and a basepath out are recorded. This system of buttons keeps the hits, errors, outs, and current baserunners straight. The Other OB button is used to record batters reaching after being hit by a pitch and so on. It even has the option of the batter reaching first base after a dropped third strike, properly recording the strikeout while removing the out.

The middle yellow section above shows the current situation in the inning: outs, runners on base, and the ball and strike count on the hitter. The cumulative game totals of balls and strikes (including balls put in play etc.) for the current pitcher are shown above that section. A tap of the Details button brings up the cumulative game totals for pitch results, runs allowed, baserunners, etc. for the current pitcher, as shown in the screen shot below.

review

The pitcher whose results are shown above pitched only one inning as closer, but the same totals for every pitcher in the game can be brought up for inspection by a tap of the Review button followed by a scroll and a tap to select the pitcher from the list of those recorded (see below). All pitchers appearing in the game for either team can be recorded. Or, a single pitcher appearing at any point in the game can be followed alone, depending on the user’s interest. All of the data recorded in a given game is saved on the iPhone or iPod Touch and can be reviewed at any time with prednisone the OnScreen Pitch Count app.

list

When I started to work on this project there were no competing apps that I was aware of, but since then a few have appeared. OnScreen Pitch Count lies in between some that seem to be really barebones counters of balls and strikes (with limitations on the number of pitchers) and much more detailed “pitching scout” type apps that record more data but are aimed at tracking individual pitchers over time. I think OnScreen Pitch Count should find  a comfortable place in this niche of pitch recording apps. I’m pretty confident it can more than hold its own in usability and usefulness. As far as I’ve been able to tell from scanning app descriptions, OnScreen Pitch Count is the only app that properly charges runs to the pitcher that allowed the scoring runner to reach base even when the run scored after a relief pitcher had come into the game.

Of course, interrupting the pitch-recording to answer the iPhone or to play a game between innings has no effect on OnScreen Pitch Count, and it will resume right where it left off whenever it’s pressed into service again. This happens automatically for pauses of up to an hour, but you can resume any unfinished game at any time, whether after a long rain delay or after you’ve paused a game tape for days.

How much will it cost? I’m leaning toward $2.99. It would be worth a lot more than that to some people, but the way mass appeal apps have been forced to fight for attention on the App Store has led to popular games being sold for 99¢. OnScreen Pitch Count is not competing in the popular game market, but the depression in game prices has led to iPhone users’ expecting very low prices on anything they buy.

I should mention that I found in my testing of OnScreen Pitch Count, watching both local softball games and televised major league games, that the spectator experience was enhanced by following with such close attention and having so much information literally at my fingertips. I would have loved to have had the information when I was coaching Little League. It was a lot of work to program OnScreen Pitch Count, though the development tools Apple supplies are excellent. Further improvements and my next app (I have an idea!) will be easier, assuming I get on with it before I forget what I’ve learned.

In a day or two after I post this I should have more information about OnScreen Pitch Count up at this link: http://nondummies.com. I plan to have a video demonstration.

UPDATE: See also “OnScreen Pitch Count Now On Sale on iTunes App Store!”, “IPhone App Updates and Experiences”, and “OnScreen Pitch Count 1.3 Is Now on the iTunes App Store”.

Some Google Search Examples to Start Off July

Monday, July 6th, 2009

“I’m shooting for one entry a week.” That’s what I stated when I first put this blog on the internet. The past couple of months I have fallen pathetically short of this. The main reason is that I have been spending time and mental energy programming an iPhone (and iPod Touch) “app.” It’s neither earth-shaking nor a potential fortune-maker, but I think it will be useful to baseball coaches (and the parents of pitchers) at all levels and to fans who might like to keep better track of how a pitcher is doing than they can from the statistics typically displayed during a game. The app is a pitch counter that allows one to record, not just balls and strikes, but also the kinds of strike (swinging, called, foul, or ball hit in fair territory), as well as the number of strikeouts (and what kind of strike the third one was), base runners (and how they reached base), runs allowed, batters faced, outs recorded, and of course total pitches thrown; all for any number of pitchers in a game. I’ll have more to say about it later when it’s finished. Anyone interested in being notified when it’s done should send me an email (address in upper right).

In lieu of writing one of my usual long posts, I’m going to share with you a few more of the Google search strings that have led people to this tiny spot in the great blogoverse. They will illustrate comical misdirections, obvious intention to come here, and ambiguous intention; sometimes giving me a glimpse into how the blog is perceived. I enjoy seeing them.

Even more so than before, the people coming here for advice on how to get their Macs to run at a lower temperature greatly outnumber all others combined. I’m just happy that I finally have a solution for most of these frustrated seekers of relief, as I related in “What a Relief! MacBook Pro Overheating Problem Cured—Really” and “Too Good to Be True? My MacBook Pro: First Cool, Now Quiet.

As an example of a mistaken visit, I’m pretty sure the person that searched Google for “pulled pork lowell ma delivery” was a Lowell, Massachusetts, resident who wanted barbecue brought to his or her door. Yet Google, a word matcher without the ability to judge intent, just noticed that I had recorded buying a pulled pork sandwich at a Lowell Riptide pro softball game where I had also noted a peculiarity in a pitcher’s delivery, and thus suggested this blog as a possible destination; which suggestion was, surprisingly enough, taken.

The writeup of that softball game (An Evening in Lowell: Mixing in a Changeup) also brought to this blog someone looking for “jocelyn forest left power line.” Not remembering who Jocelyn Forest was, I at first drew a total blank on the meaning of the phrase. I had to do the Google search myself to solve the mystery. Google put the Lowell Riptide game post at the top with:

‘On-Screen Scientist » National Pro Fastpitch Jul 30, 2008… effort to learn how to coach softball pitching, Jocelyn Forest, the Riptide pitcher, instead of landing with her stride foot on the “power line” … always landed well to the left of it—yet another example of someone …’

So the match was a good one, and it had been a technical comment on that particular pitcher’s delivery that had stuck in someone’s mind. Had it been Ms. Forest herself, worrying much later that she might need to change her pitching form a little if a casual observer was making comments about it?

The story of the dying and death of our guinea pig named Chestnut (Last Days of Chestnut, Guinea Pig) continues to bring a few people here every week. Some are looking for information on pet euthanasia or guinea pig health, but a few must have somehow learned of the specific story, as witness their searches for “chestnut the guinea pig” and (probably) “guinea pigs last days.”

It’s hard to guess what the searcher for “ginipig war pitchures” had in mind; really hard, unless he or she remembered having read both the story of Chestnut and another of my posts called “Souvenirs of the Pacific War” and just wanted to find the way back here to the blog. I give Google a good deal of credit for coming back with “Did you mean: guinea pig war pictures?” That searcher did come here or I wouldn’t know about it. Still I have trouble reconciling the spelling in that search string with the act of reading either of those two rather long pieces. Maybe the searcher meant “New Guinea” instead of “ginipig” (plausible) and had no inkling of this blog’s existence.

Some Google searches seem to be clearly aimed at a particular post of mine. “Dante’s Heavenly Vision and the Physics of the Proton” is almost certainly what the people looking for “protons god,” “holy trinity hydrogen atom,” “dante paradisio dark matter,” and “dante’s quantum physics” had in mind. On the other hand, a Presbyterian minister came to it after some sort of search on the Trinity and (perhaps) physics without prior knowledge of it. I know this because she emailed me to ask permission to quote from it in a Trinity Sunday sermon she was preparing. I’m still hoping to read the sermon.

There’s no doubt what the string “on screen scientist perfect italian woman” was meant to find, as there is a post archived here called “The Perfect Italian Woman.” However, “dna of italian women” is a puzzle to me, even though I can see how Google might suggest this blog, given the DNA software I sell, in addition to the presence of the post about my Italian experience previously mentioned. If the searcher for “italian woman are not good looking” was hoping to find confirmation here for his mistaken idea, he was disappointed. However, the search string “the perfect american woman” is actually pretty good, even if the searcher probably didn’t tarry here long enough to read the post and see that. I won’t rule out the possibility that it was a deliberate search for the Italian Woman post by someone who had already read it and just got mixed up on the name.

I can’t deny that it’s gratifying to see that a few people have sought this blog out using the phrase “on screen scientist” explicitly. Whether they were returning or had somehow heard the name from someone else, I’ll never know. Those that mention the name seem mainly to be interested in questions of science and religion. For example, I have noted searches for “theist on screen scientist,” “on screen scientist moral non religious,” “on screen scientist god no bible,” and “on screen scientist recognize god.” I’m a little surprised that I’ve come across to some as being irreligious or rejecting the Bible, because I wouldn’t characterize myself that way, though I am certainly not a Biblical literalist, and I would have some difficulty in saying exactly how my belief in God translates into Christian terms. Finally, I can’t imagine where the deluded searcher for “famous on screen scientist” got his or her information. If there were another one out there, and famous to boot, wouldn’t I know about it?